• Hello and welcome to MSFC. We are a small and close knitted community who specialises in modding the game Star Trek Armada 2 and the Fleet Operations modification, however we have an open field for discussing a number of topics including movies, real life events and everything in-between.

    Being such a close community, we do have some restrictions, including all users required to be registered before being able to post as well as all members requiring to have participated in the community for sometime before being able to download our modding files to name the main ones. This is done for both the protection of our members and to encourage new members to get involved with the community. We also require all new registrations to first be authorised by an Administrator and to also have an active and confirmed email account.

    We have a policy of fairness and a non harassment environment, with the staff quick to act on the rare occasion of when this policy is breached. Feel free to register and join our community.

[WIP] Z's Models

Adm_Z

Gettin' down and GUI!
Joined
23 Nov 2009
Messages
2,745
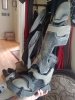
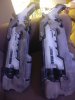
Ok, so moving on from photogrammetry, I spent a couple classes playing with a modeling process called parametric design. Certain characteristics of Maya and other modeling software have parametric functions, like how primitives retain their object histories to a certain point, but parametric design goes further than that, to have a motel entirely constructed through mathematical functions and parameters. I used a whole half of a graduate class to explore this process by creating a single object by mapping the values of the Fibonacci Sequence to certain characteristics of a model, like Z values, object dimensions, rotation, etc. These first couple pictures are all early "iterations" of the same model, bit with very small changes to specific parameters I set up as sliders.
5.png 6.png 8.png 9.png

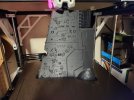
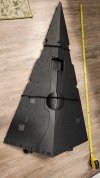
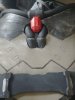
This next one I actually kept because it looks super cool. I think I plugged a value in somewhere it shouldn't have been, and ended up extruding the final object back along the z curve... whatever, it looked really cool.
7.png

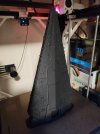
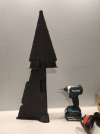
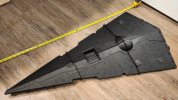
The final form I decided on looks about like this. 10.png

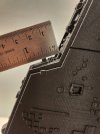
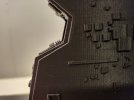
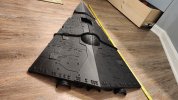
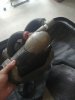
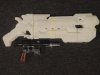
And here are the various stages of the parametric design, down to the final complete map. I used a software called Grasshopper, which is a sort of plugin for the NURBS modeling software, Rhinoceros 3D.

1.PNG 2.PNG 3.PNG 4.jpg


I later went on to 3D print, mold, and cast this object, but I'll hold off on posting all of those again, unless anyone is interested.
 

Jetfreak

Filipino Expat
Staff member
Forum Moderator
Seraphim Build Team
Master of Art
Joined
22 Mar 2008
Messages
2,564
Very impressive Zax, glad to see ya' back around here man. :)

I've seen a great surge back to physical models with the advent of 3d printing. I attended an open house here in AKL and they had impressive replica tanks and robots. The rest of the details were manually painted on though as its hard to get to that level of detail yet.
 

Adm_Z

Gettin' down and GUI!
Joined
23 Nov 2009
Messages
2,745
Good to see you jet! What do you mean they were manually printed on? Like, they were assembled pieces and parts?
 

Jetfreak

Filipino Expat
Staff member
Forum Moderator
Seraphim Build Team
Master of Art
Joined
22 Mar 2008
Messages
2,564
For the tanks, they had to print the main sections individually. Main hull, tracks and the barrel. Pretty much the same for the bots, where the arms/legs, etc. were glued together. The 3d prints themselves were plain white to begin with, and a few clever artists sanded them down to get rid of the "low poly" look. The paint jobs were done old school with acryllc and brush.

PS
I think EA used photogrammetry in the new Battlefronts. The level of detail created in this method is just insane!
 

Adm_Z

Gettin' down and GUI!
Joined
23 Nov 2009
Messages
2,745
Ah, makes sense. Honestly, that is about the quality I can print right now, though even my 3D printer has a dual extruder, so I could choose to print with either two colors, or a dissolvable support material, meaning all of those added parts could be printed as one piece, and then after a chemical (or just water) bath all parts like tank treads would move freely, and barrels would be solid instead of being stuck on pieces.

Other companies can do that, in addition to printing a texture map onto the outside of a model, so you could, for example, print any star ship with the actual texture map used in game, instead of hand painting an approximation. There is a website called Shapeways where you can upload a model and order a color 3D print from, but its not cheap. Something like $100USD for only 3 cubic inches of material.

And yesss DICE used photogrammetry for their environments and textures and it is fantastic. I really wish those games were better because their visuals are absolutely spectacular.
 

Adm_Z

Gettin' down and GUI!
Joined
23 Nov 2009
Messages
2,745
Ok, so after parametric design and photogrammetry, I dove more heavily into fabrication, meaning most of my models since have been entirely aimed at 3D printing or otherwise creating in real life. Frankly, I should start a whole different thread for the wood working and other stuff I have made.... but anyway, here are some actual 3D models I made recently.

For fans of Harry Potter, here is a neat little chest I made for a friend as a christmas present. It held a bluray copy of all 8 harry potter movies.
boxDesign1.jpg boxFinal1.jpg 20161215_012350.jpg boxFinal5.jpg

This is a model of the Red Hood's helmet, from the animated movie Batman: Under the Red Hood. I actually 3D printed this and wore it to New York Comic Con a couple weeks ago. (Sorry for the blurry selfie... someone took better pics and I"ll post when I get my hands on them)

https://skfb.ly/6ACrq
hood.PNG 20180823_172409.jpg 20180823_172418.jpg 20180823_211926.jpg

And here is a model I used as a concept for a set of coasters I was commissioned to make.

https://skfb.ly/6BEnt
Coast.PNG 20181012_132403.jpg 20181012_132504_HDR.jpg 20181012_175846.jpg
 

Majestic

Administrator
Staff member
Administrator
Seraphim Build Team
Joined
17 Apr 2006
Messages
18,325
Age
39
Pretty cool stuff. Love the 3d printing side of things. :)
 

Adm_Z

Gettin' down and GUI!
Joined
23 Nov 2009
Messages
2,745
Ok so this is going to be a double post, but here are some pics of me and some buddies at comiccon. The red helmet I'm wearing (featured a couple posts up) is one that I modeled in Mudbox and then 3D printed.


I also 3D modeled/printed all the buckles and armor bits for my costume.

1.jpg 2.jpg 3.jpg
 

Attachments

  • IMG_1364.JPG
    IMG_1364.JPG
    329.9 KB · Views: 9
  • 43255896_10215554619890037_5772100754907070464_o.jpg
    43255896_10215554619890037_5772100754907070464_o.jpg
    346 KB · Views: 9
  • IMG_1393.JPG
    IMG_1393.JPG
    245.5 KB · Views: 9
  • IMG_1445.JPG
    IMG_1445.JPG
    259.8 KB · Views: 9
  • IMG_1346.JPG
    IMG_1346.JPG
    241.7 KB · Views: 9
  • IMG_1361.JPG
    IMG_1361.JPG
    301.8 KB · Views: 9
  • IMG_1343.JPG
    IMG_1343.JPG
    237.4 KB · Views: 9

Adm_Z

Gettin' down and GUI!
Joined
23 Nov 2009
Messages
2,745
And here are pictures of another costume I made for a friend. He went as Reaper from Overwatch. Specifically his throwback origins skin called "Soldier 24". This one I 3D modeled or vector modeled pretty much everything, before either laser cutting out the foam, or 3D printing the parts. The only things I didn't model myself are the guns, but I did print and finish those.

For reference, here is the character and models from the game.
florian-neumann-reaper-01.jpg 20180807_150626.jpg 20180807_150635.jpg

And here are some of the models and vector drawings I made for my versions of the various costume parts

1.jpg 2.jpg 3.jpg

And lastly are some attached pictures of the finished costume, besides what were in my previous post.
 

Attachments

  • IMG_1329.JPG
    IMG_1329.JPG
    285.8 KB · Views: 9
  • IMG_1330.JPG
    IMG_1330.JPG
    270 KB · Views: 9
  • 20181005_165748.jpg
    20181005_165748.jpg
    326.1 KB · Views: 9
  • 20181005_165705.jpg
    20181005_165705.jpg
    389.5 KB · Views: 8
  • 20181005_165718.jpg
    20181005_165718.jpg
    251.7 KB · Views: 8
  • 20180502_194831.jpg
    20180502_194831.jpg
    364.5 KB · Views: 8
  • 20180815_221725.jpg
    20180815_221725.jpg
    258.5 KB · Views: 8

Majestic

Administrator
Staff member
Administrator
Seraphim Build Team
Joined
17 Apr 2006
Messages
18,325
Age
39
Awesome work mate. I went to the Sydney comic con this year myself.
 

Archonon

Master Chief Petty Officer of Starfleet
Joined
13 Aug 2016
Messages
539
Age
46
Great job with the 3D printing Z. I can imagine it got a bit hot under that helmet while at the con.

Great choice in costume Maj; I have a replica of Crichton's leather trench though I use it as just regular clothes when going out at certain temperatures (Autumn and cold/windy days). Man I miss Moya's crew zipping around the galaxy.
 

Adm_Z

Gettin' down and GUI!
Joined
23 Nov 2009
Messages
2,745
The helmet wasn't actually too hot, but the leather jacket was haha. I made the helmet a bit too tight around my forehead so I ended up with bruises... oof
 

Archonon

Master Chief Petty Officer of Starfleet
Joined
13 Aug 2016
Messages
539
Age
46
Dang man, it ain't good if it's not comfy. But hey, the sacrifices we make to look good am I right? Lol.
 

Adm_Z

Gettin' down and GUI!
Joined
23 Nov 2009
Messages
2,745
Well, the issue was, I was trying to recreate the triangular eyes from the cartoon, but I ran out of time to come up with an elegant solution, so I just had this little plastic mask thing I shoved in between my face and the helmet, which made what was otherwise very carefully measured and comfortable, too tight, and painful haha.
 

kjc733

Wibble
Staff member
Site Manager
Seraphim Build Team
Master Shipwright
Joined
30 Mar 2008
Messages
2,477
Age
39
Mars 3?
How well did the bits fit together? Last time I did that nothing fit as there was expansion.
 

Adm_Z

Gettin' down and GUI!
Joined
23 Nov 2009
Messages
2,745
Mars 3?
How well did the bits fit together? Last time I did that nothing fit as there was expansion.
This one is from FAB365 and the parts went together almost perfectly. One of the turrets needed a dab of glue on the mounting hinge, and one of the landing gears should be glued in if I wanted it permanent. But otherwise, for a somewhat sloppy print, it came out really well.
 

Chiletrek

Warriors from Fluidic Space
Staff member
Forum Moderator
Toaster
Joined
22 Oct 2006
Messages
3,474
Age
42
Hello:
Those models do look detailed indeed!
 

Terra_Inc

MSFC's Cheshire Cat
Staff member
Site Manager
Necromancer/Troll hunter
Kitten Commander
Joined
16 Dec 2009
Messages
3,137
Age
34
That does look really good, yeah.
 

Chiletrek

Warriors from Fluidic Space
Staff member
Forum Moderator
Toaster
Joined
22 Oct 2006
Messages
3,474
Age
42
Hello:
It would be awesome of you could wear it :D
 

Admiral*Alex

Petty Officer 2nd Class
Joined
4 Apr 2018
Messages
208
Age
26
That's 501st quality right there. I didn't know such a large print could look so good.
 

Adm_Z

Gettin' down and GUI!
Joined
23 Nov 2009
Messages
2,745
Hello:
It would be awesome of you could wear it :D
You can indeed! 319691149_880669926463665_4840532925112140421_n.jpg

Though you look like a dork without the lenses haha.

That's 501st quality right there. I didn't know such a large print could look so good.
Thanks! It actually looked a lot more smooth and clean in person too. Something about the camera and the layer lines has the effect like the weatherman wearing a checkered shirt. Looks very harsh.
 

Adm_Z

Gettin' down and GUI!
Joined
23 Nov 2009
Messages
2,745
Alright, thanks to kjc finding that model for me, I've finally gotten around to this project. I'm working on making a large wall hanging backdrop in the form of the bottom side of a Star Destroyer. The final model will be 2 ft wide and about 3 1/2 ft long. Though I might be able to print it in fewer pieces, I chose to print it in five parts on my larger 3D printer, and so far, I'm completely blown away by the quality. These results were achieved with a .12mm layer height and no supports to speak of. Each of the five pieces is taking around 3 days to print. I'll try to keep updating this thread with pictures of the assembly, finish, and painting process!
 

Attachments

  • 20230821_075832.jpg
    20230821_075832.jpg
    470.9 KB · Views: 12
  • 20230823_080803.jpg
    20230823_080803.jpg
    529.8 KB · Views: 11
  • 20230824_214636.jpg
    20230824_214636.jpg
    1.1 MB · Views: 12
  • 20230826_203054.jpg
    20230826_203054.jpg
    857.1 KB · Views: 11
  • 20230826_203010.jpg
    20230826_203010.jpg
    288 KB · Views: 13

Adm_Z

Gettin' down and GUI!
Joined
23 Nov 2009
Messages
2,745
All the major parts finished being printed! Now the real work begins...
 

Attachments

  • 20230906_002457.jpg
    20230906_002457.jpg
    1.7 MB · Views: 8
  • 20230906_002510.jpg
    20230906_002510.jpg
    757.7 KB · Views: 8
  • 20230906_002641.jpg
    20230906_002641.jpg
    551.4 KB · Views: 8

Jetfreak

Filipino Expat
Staff member
Forum Moderator
Seraphim Build Team
Master of Art
Joined
22 Mar 2008
Messages
2,564
Details are solid! Though I must admit the black coloration adds to the extra evil factor :)
 
Top