• Hello and welcome to MSFC. We are a small and close knitted community who specialises in modding the game Star Trek Armada 2 and the Fleet Operations modification, however we have an open field for discussing a number of topics including movies, real life events and everything in-between.

    Being such a close community, we do have some restrictions, including all users required to be registered before being able to post as well as all members requiring to have participated in the community for sometime before being able to download our modding files to name the main ones. This is done for both the protection of our members and to encourage new members to get involved with the community. We also require all new registrations to first be authorised by an Administrator and to also have an active and confirmed email account.

    We have a policy of fairness and a non harassment environment, with the staff quick to act on the rare occasion of when this policy is breached. Feel free to register and join our community.

KJC's 3D Printing

kjc733

Wibble
Staff member
Site Manager
Seraphim Build Team
Master Shipwright
Joined
30 Mar 2008
Messages
2,477
Age
39
Given a lot of my work lately has been geared towards printing on Shapeways and as I am eagerly awaiting an Elegoo Mars 2 resin printer, I thought that I would kick off a new thread dedicated to the subject of 3D printing. My living room looks like a bit of a jumble sale with Amazon boxes and boxes of gloves, filters and all the other stuff needed.
Actually, that may not be a bad place to start. I've discovered that resin printing requires a metric ass tonne of consumables and support equipment. What I have so far...
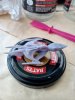
- 1 litre of Elegoo ceramic grey water washable resin. It's a bit more expensive but I didn't want the hassle of also needing to use IPA to wash things down (ie one toxic chemical is better than 2).
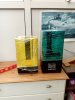
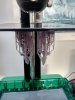
- 1 Elegoo Mercury Plus combined wash and cure station. Hopefully a bit of a cleaner workflow than dunking between buckets. Also contains the UV array to quickly cure the resin.
- 1 pair of safety glasses, tinted to look cool :lol2: (actually I find a tint helps in viewing small detail, maybe it's just me)
- 1 box of nitrile powder free gloves. Resin is nasty stuff, I don't want it cooking on my skin. Apparently this is better than rubber gloves, not sure why.
- Masks. Already had these anyway. Depending on how bad the fumes are I may switch to a respirator.
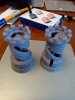
- a pack of 100 filters plus funnel. Needed when removing excess resin from the vat to make sure there's no solid bits in there if you want to reuse it, as this could damage the FEP film in the base of the vat.
- a pair of flexible mini squeegees. To help clean the vat without damaging the delicate FEP surface.

What I'm missing, is a printer!
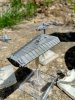
As the resin gives off fumes and there is the potential for spillages, I'll be doing the printing in the conservatory. This is likely to mean I'll be constrained in when I can print due to temperature, but it's the only well ventilated room in the house. I have a nice heavy set of drawers in there I intend to use as a stable base... unfortunately I have discovered it isn't level so I'll need to jack that up first. Then put down some plastic sheeting or some trays of some type (silicone mats used for animal food bowls were suggested so I may pick up a couple).

I've been watching a lot of youtube videos over the weekend, it seems the key to a good resin print is good supports. This channel provides a lot of good advice.
https://www.youtube.com/channel/UCbv2mDrRqXovPdahRyoCFhA/videos

To anyone building models for the purpose of 3D printing, I suggest this one in particular.

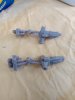
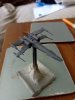
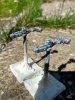
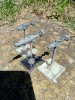
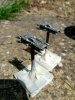
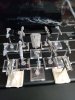
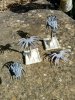
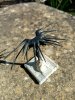
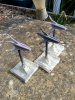
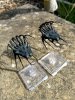
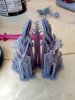
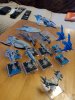
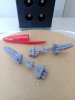
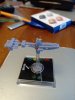
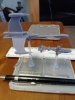
And just to finish off, here's a photo of my Shapeways fleet (most of them anyway).
Hopefully I'll provide updates later this week...
 

Attachments

  • IMG_20210125_163211.jpg
    IMG_20210125_163211.jpg
    713.5 KB · Views: 14

-RJB-

Nyarlathotep The Crawling Chaos
Staff member
Site Manager
Master of Art
Walking Genocide
Joined
5 Aug 2007
Messages
1,262
Age
40
Look forward to seeing what you print and nice fleet so far.
 

Hellkite

Lord of Death
Staff member
Administrator
Seraphim Build Team
Star Fighter
Joined
23 Apr 2006
Messages
7,650
Resin printing is something that I have not got into yet, but filament 3d printing I have three printers
set up in my garage and the set up of your work area is key to get a good print
 
Last edited:

kjc733

Wibble
Staff member
Site Manager
Seraphim Build Team
Master Shipwright
Joined
30 Mar 2008
Messages
2,477
Age
39
Three?!?! Are you setting up a production line?
Anyway, it's finally arrived!
 

Attachments

  • 4e445bd9-9d6b-4601-b98e-bc537978f24b.jpg
    4e445bd9-9d6b-4601-b98e-bc537978f24b.jpg
    148.1 KB · Views: 9

Hellkite

Lord of Death
Staff member
Administrator
Seraphim Build Team
Star Fighter
Joined
23 Apr 2006
Messages
7,650
If I need to LOL

It's just that I have gotten more over the years, that and I have a son that into printing as well helps not to have to wait for a printer to be open.
 

kjc733

Wibble
Staff member
Site Manager
Seraphim Build Team
Master Shipwright
Joined
30 Mar 2008
Messages
2,477
Age
39
For those that don't know what I mean by "supports", the model when it is printed is suspended beneath a platform that gets lowered into a vat of resin. Each time it does so UV lights harden a layer on the bottom of the vat, and when the platform is raised it pulls the model back out plus new layer. The support structure is necessary to ensure the model adheres to the platform (and not the vat!!) and also to ensure any protrusions are anchored as the parts of the model they attach to may not exist yet.
For example, the barrel of a gun may start printing before the turret does, so it would be free floating and the supports are needed to ensure it stays in the correct position relative to the rest of the model.

I'm doing my supports in chitubox. The blue is the hull of the Victory, and the grey tubes are the "scaffolding" to support it.
(Yes I'm building the drydock after the ship is completed :rolleyes:)
 

Attachments

  • image_2021-05-21_215539.png
    image_2021-05-21_215539.png
    292.6 KB · Views: 9

Hellkite

Lord of Death
Staff member
Administrator
Seraphim Build Team
Star Fighter
Joined
23 Apr 2006
Messages
7,650
Yes scaffolding is a necessary evil of printing

For Me filament 3d printing it is reversed plate building up as the head lays layers , Were your is plate builds down towards the vat and uv head.

f&r.png
 

kjc733

Wibble
Staff member
Site Manager
Seraphim Build Team
Master Shipwright
Joined
30 Mar 2008
Messages
2,477
Age
39
Looking at that I'm wondering if I've gone overkill on my supports.
Anyway, problem #1 - it uses an EU plug :rolleyes:

UPDATE 16:00
A trip to PC world to pick up an adapter and set it going around 12:30. About 3hrs later the test print was complete. Dunked it in the washer for 6 minutes then tried to remove it from the base plate. Damned thing did not want to come off (damage on the model from metal scraper not bad printing)! Anyway, eventually did, and then 2mins at the cure station. Job done. Have a feeling it's a little over exposed, the settings seem a little high compared to my research.

One of my own models is in now (complete with scaffolding) with adjusted settings. Should be done in another 3hrs 20...

UPDATE 20:00
Ok, now I'm really impressed. I did not expect this to print!
 

Attachments

  • IMG_20210522_150328.jpg
    IMG_20210522_150328.jpg
    450.5 KB · Views: 14
  • IMG_20210522_152552.jpg
    IMG_20210522_152552.jpg
    455.6 KB · Views: 14
  • IMG_20210522_154650.jpg
    IMG_20210522_154650.jpg
    450.6 KB · Views: 12
  • IMG_20210522_191332.jpg
    IMG_20210522_191332.jpg
    536.3 KB · Views: 11
  • IMG_20210522_194632.jpg
    IMG_20210522_194632.jpg
    380 KB · Views: 16
  • IMG_20210522_194957.jpg
    IMG_20210522_194957.jpg
    395.1 KB · Views: 12
Last edited:

Hellkite

Lord of Death
Staff member
Administrator
Seraphim Build Team
Star Fighter
Joined
23 Apr 2006
Messages
7,650
Welcome to a grater brave new world Kjc Mando
 

kjc733

Wibble
Staff member
Site Manager
Seraphim Build Team
Master Shipwright
Joined
30 Mar 2008
Messages
2,477
Age
39
Todays print, the Victory.
I just did a shapeways check, that would have cost me ÂŁ48 (and they say its not printable :rolleyes:).
Add in a pair of Hyperions at ÂŁ5.40 each, plus the ÂŁ14 p&p, that takes me to about ÂŁ73. Nearly paid off the washer :lol2:
 

Attachments

  • IMG_20210523_160331.jpg
    IMG_20210523_160331.jpg
    444.2 KB · Views: 12
  • IMG_20210523_164521.jpg
    IMG_20210523_164521.jpg
    438.1 KB · Views: 11
  • IMG_20210523_174700.jpg
    IMG_20210523_174700.jpg
    442.3 KB · Views: 11

Hellkite

Lord of Death
Staff member
Administrator
Seraphim Build Team
Star Fighter
Joined
23 Apr 2006
Messages
7,650
See it was as I told you, it's cheaper and better to own your own printer in the long run. :salute:
 

kjc733

Wibble
Staff member
Site Manager
Seraphim Build Team
Master Shipwright
Joined
30 Mar 2008
Messages
2,477
Age
39
These T-85s took a lot of work to get a successful print! 11 failed prototypes to get 4 successful prints! That'll teach me to be lazy and not make my own meshes.
Still, a T-85 costs ÂŁ25 on Mel's Miniatures
 

Attachments

  • IMG_20210601_161725.jpg
    IMG_20210601_161725.jpg
    516.2 KB · Views: 7

Hellkite

Lord of Death
Staff member
Administrator
Seraphim Build Team
Star Fighter
Joined
23 Apr 2006
Messages
7,650
Failed prototypes are not real failures as long as you learned something :thumbsup:

That and you still under cost of having someone print them for you :)
 

kjc733

Wibble
Staff member
Site Manager
Seraphim Build Team
Master Shipwright
Joined
30 Mar 2008
Messages
2,477
Age
39
Such as... Don't leave the Wash/Cure machine set to Cure when you put it the model in to wash. After a 3.5hr print I have two wrecked Hyperions because I forgot to switch the setting. Seems like a design flaw to me to set the default as cure when a. You do a wash first and b. having it set to wash when you try to cure isn't going to do much (except possible spin the models at high speed...) whereas setting to cure when it's in a bucket of water wrecks the model. Oh well.

EDIT 03/06/2021
Attached a photo of the outcome. Plus a close-up of a good primed T-85
 

Attachments

  • IMG_20210603_175919.jpg
    IMG_20210603_175919.jpg
    380.5 KB · Views: 8
  • IMG_20210603_175713.jpg
    IMG_20210603_175713.jpg
    390 KB · Views: 6
Last edited:

kjc733

Wibble
Staff member
Site Manager
Seraphim Build Team
Master Shipwright
Joined
30 Mar 2008
Messages
2,477
Age
39
Had a few hours to kill so I painted two (of my five!!) Hyperion cruisers.
Not sure yet how I'm going to paint my Victory...
 

Attachments

  • IMG_20210604_153431.jpg
    IMG_20210604_153431.jpg
    606 KB · Views: 14
  • IMG_20210604_153513.jpg
    IMG_20210604_153513.jpg
    1.1 MB · Views: 15

kjc733

Wibble
Staff member
Site Manager
Seraphim Build Team
Master Shipwright
Joined
30 Mar 2008
Messages
2,477
Age
39
Printed and painted an Avenger carrier I found (and painted the rest of my Hyperion's). The printer is churning away again today so hopefully my EA fleet will soon be complete...
 

Attachments

  • IMG_20210612_122456.jpg
    IMG_20210612_122456.jpg
    706.4 KB · Views: 10

kjc733

Wibble
Staff member
Site Manager
Seraphim Build Team
Master Shipwright
Joined
30 Mar 2008
Messages
2,477
Age
39
Today adds a pair of Olympus Corvettes. I think that's a nice sizable, well rounded Earth fleet.
Again the Olympus was a model I downloaded, and again (despite being on a 3D print site) the model wasn't really made for printing, so they both ended up with a little damage despite my modifications.
 

Attachments

  • IMG_20210613_140414.jpg
    IMG_20210613_140414.jpg
    646 KB · Views: 18
  • IMG_20210613_151222.jpg
    IMG_20210613_151222.jpg
    683.4 KB · Views: 17

kjc733

Wibble
Staff member
Site Manager
Seraphim Build Team
Master Shipwright
Joined
30 Mar 2008
Messages
2,477
Age
39
The coming of Shadows...
The Scout was one I downloaded and worked pretty much out the box. The cruiser is my own, but scaled up a little from what I sell on shapeways (when they let me sell it).
 

Attachments

  • IMG_20210614_164941.jpg
    IMG_20210614_164941.jpg
    1.3 MB · Views: 24

Lutz

Cadet Freshman
Joined
19 Oct 2020
Messages
23
Age
28
Oh wow, pretty cool to see someone printing Babylon 5 ships. Did you already primed them? I mean I know you using a resin printer but this miniatures look amazingly clean.
 

kjc733

Wibble
Staff member
Site Manager
Seraphim Build Team
Master Shipwright
Joined
30 Mar 2008
Messages
2,477
Age
39
If you are referring to the Shadow ships, it is hard to tell in that light but the two scouts and the cruiser on the stand are primed in Halfords grey primer. The cruiser on the floor is unprimed. If you really look you can see it's slightly lighter and shinier.
The resin I'm using is Elegoo water-washable ceramic grey. With (almost) default settings it does come out very smooth and good on the detail. However, the key to it is good supports. I'm still learning as I go along but in short:
You need larger supports to support heavier parts of the model.
Larger supports are more likely to cause damage on removal, so hide them where possible.
Use lighter supports to ensure that detail is maintained.
Sometimes you do need a fine file to clean off the remains of the supports, but so far I haven't had to do much of that.

The problem with the B5 ships is that people post really nice models online, but they are just too finely detailed for printing at this scale. I've been printing some Minbari frigates and the fins keep getting damaged because they are only 0.4mm thick - this is after I've bulked them out significantly!
 

Lutz

Cadet Freshman
Joined
19 Oct 2020
Messages
23
Age
28
Holy... half a mm... uff.
I heared that resin print is much cleaner then printing with filament like PLA. But I actualy never saw a resin print in this scale.
I curious to see how they look with your finished paintjob. It sucks that the B5 models brake that easy and don't have the detail. Form what I can remember it will be pretty difficult to paint the pattern of the hull.
 

kjc733

Wibble
Staff member
Site Manager
Seraphim Build Team
Master Shipwright
Joined
30 Mar 2008
Messages
2,477
Age
39
Resin printers are capable of much finer detail but the trade-off is smaller overall volumes. Mine maxes out the height at about 15cm I think, and you run the risk of separation from the build plate. Plus, until very recently, lots of nasty chemicals involved. I'm still determining the optimum way to dispose of my waste water.
The frigate only breaks easily because I took a short cut and used someone else's mesh rather than make my own. If I had done my own the find would have been much thicker and they would have been fine. I did thicken the tail significantly but I couldn't easily do the "wings"for various reasons.
As for my Shadow paint scheme, oh ye of little faith :D
I'm debating whether or not to go over it with PVA to give a shiny appearance.
 

Attachments

  • IMG_20210615_165332.jpg
    IMG_20210615_165332.jpg
    795.4 KB · Views: 28

Hellkite

Lord of Death
Staff member
Administrator
Seraphim Build Team
Star Fighter
Joined
23 Apr 2006
Messages
7,650
I think it looks good as is my friend :thumbsup:
 

Lutz

Cadet Freshman
Joined
19 Oct 2020
Messages
23
Age
28
Oh you're sprying little dark drips on the shadow cruiser. That looks incredible!

Do you have to use UV-light to cure the resin?
 

kjc733

Wibble
Staff member
Site Manager
Seraphim Build Team
Master Shipwright
Joined
30 Mar 2008
Messages
2,477
Age
39
Yep, the good ol' toothbrush method.
I figure I'll leave it overnight to properly set and see how I feel about it tomorrow.
The Shadow ship was primed in grey, then a coat of leadbelcher, then two coats of nuln oil, followed by a black spray.

Yes, uv to cure the resin. I have a combined wash/uv station, have to remember to make sure to use the correct setting as I found out the hard way...
 

Lutz

Cadet Freshman
Joined
19 Oct 2020
Messages
23
Age
28
Ha.. how could I miss your earthgov ships. Just realized your intire fleet. Sometimes I'm just blind xD
I hope you will keep us updated on this miniatures especially the paintjob!
 

Chiletrek

Warriors from Fluidic Space
Staff member
Forum Moderator
Toaster
Joined
22 Oct 2006
Messages
3,475
Age
42
Hello:
I like a lot the painting you gave your Shadow battleship :thumbsup: .
 

kjc733

Wibble
Staff member
Site Manager
Seraphim Build Team
Master Shipwright
Joined
30 Mar 2008
Messages
2,477
Age
39
Minbari reinforcements, a pair of completed shadow scouts, and a pair of failed whitestars. Judging from the lines on the lower ends of the supports and how the print quality improved later, I suspect the vat was too cold and needed warming and mixing first. Have another pair in the printer right now so we'll see.

EDIT - nope, failed in exactly the same way. The support structure can't be sturdy enough...
EDIT Again - tried a different Whitestar setup, failed in pretty much the same way. I discovered a couple of things:
1. The support settings had got messed up somehow, so my medium supports actually had the same contact size as the lights, which means I was trying to print a Whitestar on 90% light supports!!!
2. The last Tinashi I printed actually has some similar delamination lines in part of the tail, so possibly it did actually suffer the same problem.
So I cleaned out the vat, replaced the resin (and pre-warmed it) and tried another Shadow Cruiser, which has printed out perfectly. So time to finish up yet another Whitestar support structure and try again...
 

Attachments

  • IMG_20210616_163443.jpg
    IMG_20210616_163443.jpg
    1.1 MB · Views: 9
  • IMG_20210616_163401.jpg
    IMG_20210616_163401.jpg
    884.6 KB · Views: 8
  • IMG_20210616_163503.jpg
    IMG_20210616_163503.jpg
    425.9 KB · Views: 9
Last edited:

kjc733

Wibble
Staff member
Site Manager
Seraphim Build Team
Master Shipwright
Joined
30 Mar 2008
Messages
2,477
Age
39
Success! Lucky number seven!
 

Attachments

  • IMG_20210618_194353.jpg
    IMG_20210618_194353.jpg
    546.7 KB · Views: 8
Top